Showing posts with label wall art. Show all posts

Tuesday, December 4, 2012

Christmas Art Print

Last Friday I mentioned that our Christmas colors this year were going to be gold and blue.  I also stated that the colors were subject to change at any moment.  Well, they did.  We ended up doing silver and blue (turquoise and light blue).  One of the tasks that I completed this past weekend was creating a Christmas art print to display on our mantel.  I found a Christmas quote by Charles Dickens, "I will honor Christmas in my heart and try to keep it all the year".  I typed it up using various fonts and sizes then added two Christmas trees.


It could be a daily mantra and be displayed all year just as a reminder that the Christmas spirit is not something that you should only turn on for a month.

We received a silver frame as a wedding gift but never put a picture in it.  I decided to use it to display the print.


*pictures of the mantel are to come later this week!

As an added bonus, I am offering this print as a free download!  I also created a red and green print if those colors match your holiday decor better :)  Just click the image to be redirected to the file for downloading.  The print size is 8 x 10.


Enjoy, and if you decide to display the print I would love to see what you do with it!

(I am linking up for the Christmas Cheer Holiday Link Party at Hi Sugarplum)

Wednesday, October 17, 2012

Wall Art from a calendar

Since I posted about the DIY dry erase board for my office yesterday, I decided to keep up the office momentum.  I had a calendar from 2006 that I kept because I loved the illustrations.  It's called "Haute Couture Vintage Fashion Illustrations" by Rene Gruau.


The illustrations were just too pretty to trash, so I kept them for six years just to hang them in the right place.  My office is not decorated at all.  I'm still trying to clean it up...a project that has been a work in progress for three years (yikes!).  My walls are bare.  The only thing that is hanging is a pair of curtains to keep the cold weather out.  Anyway, I decided to attach all of the illustrations to a matte board and hang it above my computer.


Now I have a little ray of sunshine in here!

Wednesday, April 4, 2012

Filling the Gap

The living room wall is now complete!  I finished the painting and am amazed at how different the room looks.  Of course the whole space isn't complete, but this wall is done for the moment.

I was inspired by a painting that I came across on Pinterest via Brunch at Saks and decided to put my own spin on it.

The Inspiration:


Just to refresh your memory, this is the area before...


Then I changed out the tv stand and added bookcases...


 Now the gap is full!


Major transformation I'd say.

By the way, did you know that there are Pantone acrylic paints?  I didn't.


On to the next wall...where the fireplace lives.

Wednesday, November 2, 2011

Pinterest Challenge- Autumn Edition

It's definitely autumn people.  What better way to embrace it than a little Pinterest challenge?

If you are an avid reader of the Young House Love and/or Bower Power blogs, you probably have already caught wind of this.  If not, let me explain...

To sum it up, Pinterest is a site where you can pin inspiring images, recipes, cleaning ideas, clothes, color schemes, hair styles (pretty much anything that makes you go nutzo) to boards that you create.  For the challenge, you were to find something that you have pinned and DIY your own version of it.

My Inspiration Photos                                     


credits 1 2

I have seen these types of images all over pinterest and since I am working on a secret project (to be revealed in a few weeks!), I decided to create my own version for this room.

The Process                                                

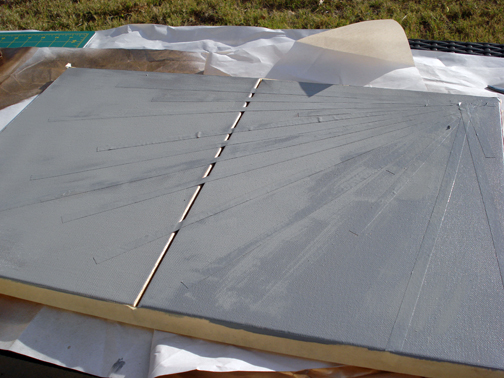
1. I decided to do a multi-canvas art piece.  To start, I wanted the edges of both canvases gold, so I sprayed them.


2. Next, I taped the two canvases together and continued spraying them gold (this is my favorite spray paint color at the moment btw).


3. I wanted smaller lines, so next I cut the art tape in half using an x-acto blade.

 
4. After about 10 minutes I stuck the tape onto the canvases in a pattern that I enjoyed.


5.  Because of my indecisive nature, I have lots of sample paints.  I decided to use a dark gray paint as the background color.  I painted all over the canvas after taping the edges off because I still wanted those gold edges.


6.  After a little time I peeled the tape off.  Did it bleed?  Yes, in some spots.  Patooey!  For the spots that bled I simply touched the edges up with a small paint brush.

The Outcome                                              


I rather enjoy the outcome.  Unfortunately the tape that I used wasn't the best which was the cause for the bleeding.  Next time I'll use painters tape!

So after this was complete I got a little spray paint happy.  Blame it on the fresh, crisp autumn air...or the paint fumes.  I ended up spraying some natural elements that I'm going to be using for my tablescape for Thanksgiving (more on that later) and I found myself hunting around the house for things to spray.  I ended up finding this-


Guess what happened...

Extra Credit!                                                


I haven't quite decided on a layout for these items, but here they are together


...although I also like this for the plate


I'll figure it out (one day)!

For more Pinterest Challenge fun, check out the ladies that are heading this thing up!

Sherry: Young House Love
Katie: Bower Power
Ana: Ana-White
Erin: House of Earnest

*addition: Morgan at Mrs. Priss is also heading up a pinterest challenge!  Check it out and link up here!

Have you worked on any fun DIY projects lately?  Please share!

Thursday, August 18, 2011

The Painting

A friend of mine asked if I had found a place for the painting that I completed, and I said yes.  She then asked if it was on my blog...which I replied no. Oops!  Well here's where it is located:


Thursday, June 2, 2011

Artsy Fartsy

Yeah, that's me. I'm an artist. I may not wear thick framed black glasses every day {the stylish type}, I may not have an avant-garde hairstyle, I may not wear mismatched clothes and I may not cut my ear off and send it to my lover...but doggonit I'm an artist! Here's proof:


I started this painting on Monday evening and finished Tuesday night. Pretty good for a decisive person in training wouldn't ya say? Now I have to decide if it's going to stay on the mantel or hang above the buffet in the dining room...


*Okay, I realize that was possibly stereotypical of artists, but I meant it in all fun. No harm intended :)

Tuesday, May 10, 2011

Kitchen Progress

This post comes to you after weeks of pleasant changes (which is why I haven't posted in so long...forgive me!).


When I last spoke of the kitchen, I showed the pre and post painting pictures. We have made a few more additions, though we aren't done completely. To start, I visited the site 20x200 which is a site that you can purchase various pieces of limited edition wall art in a variety of sizes at a variety of prices. According to their website,

"When we first launched, the smallest size was reprinted in the largest batch — an edition of 200 — and sold at the lowest price — $20. Hence the name 20x200".

Cute/Witty right? Since I am a visual artist, I tend to enjoy things that aren't of the norm, and I pay close attention to certain details. Okay, maybe I'm just anal. Tomato Tomahto. Any who, I didn't know what kind of imagery would look nice in a kitchen. I didn't want anything that screamed, "This is a kitchen!!", but I didn't want anything that screamed, "This is NOT a kitchen!!". After searching, I came across this image:

It's called "Ideal Bookshelf 102: Cooking" by Jane Mount. According to her,

"I paint people's ideal bookshelves: your favorite books, books that changed your life, books that made you who you are."

Granted, I'm not a chef, but I still appreciate the design of book covers and such. So I ordered it. The best part about it is that I already had a frame in mind to use (re-purpose!). I was planning to get a mat board to place the image inside of the mat and have Michaels (or whoever) cut it down to size. Then miraculously, as I was cleaning out the guest room closet (more on that later), I found old art work of mine and old mat board! Hence, I did my own matting and framing.
Progress:
The final piece:

Oh, did I mention that I bought a rug it Ikea that was only $20?! Hopefully it won't fall apart, ha! It's held up well thus far.
Here it is all together:
Now I just need to find a new light fixture to replace the fluorescent one that is there, and attempt to organize/decorate the pantry. Okay, maybe I'm being a little overzealous on that one.