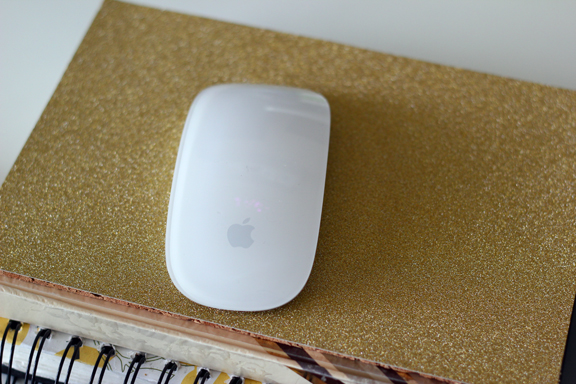
Yesterday I showed you all my updated desk area and mentioned that I DIYed a mouse pad. It was rather simple and quick. I found a gold glitter paper and cork board "paper" at Michaels, cut them down to size and glued them together. Simple as that!
Before, I was using two sketchbooks on top of each other.
Well, I'm still using them, but I made the mouse pad to cover up the top of the sketchbook. Also the mouse would glide smoother over the new pad.
Draw the shape that you want your mouse pad to be onto the cork board and decorative paper and cut them out. I just used the sketchbook as a template since it would be placed on top of it ultimately.
Next, glue the two pieces together. I used rubber cement because I have a big can of it and I'm fond of it.
And voilĂ !
I also had a little extra left over so I made this L.
Enjoy your weekend!
Showing posts with label DIY. Show all posts
Friday, August 9, 2013
Thursday, August 8, 2013
Office Updates
Hello guys! My office has been a work in progress for a while now (definitely over a year), and I have slowly been bringing in things that I like and find useful yet aesthetically pleasing. The last time I showed you all my desk I had found a solution for holding my pens/pencils/markers.
A few months before that I showed you all the art work that I put together from a seven year old calendar.
Well on a trip to ikea a while back I picked up a couple of shelves that were supposed to be for pictures. I had other plans of course...but it took a long time for me to finally decide to hang them. I also purchased a different desk tray to hold items neatly. I changed out the lamp (free because I already had the base and the shade but they were already occupied by something else) and DIY'ed a mouse pad. Lastly, you may recall my new year's day shopping trip at Target where I racked up on $30. I purchased some pink LED string lights with the intention of using them in my office.
Initially I wanted to use them to outline my desk, but I decided on something much more neat/organized and...Me! Okay, enough talk!
My job moved to a new building last week, so the company gave a lot of things away to us from the old office. I snagged a few items that will be making their way into the office as well. Those transformations will come in a later post. In the meantime, enjoy the rest of your day!
![]() |
| Original paintings by moi! |
My job moved to a new building last week, so the company gave a lot of things away to us from the old office. I snagged a few items that will be making their way into the office as well. Those transformations will come in a later post. In the meantime, enjoy the rest of your day!
Labels:
decoration,
DIY,
office
Monday, July 8, 2013
DIY Party Horns (AKA Dollar Store Hack)
Hello there! I hope you all had a great weekend. Mine was busy, but I had a four day weekend so I can't complain.
I wanted to share with you all a recent DIY project that I completed. I'm in the process of finalizing a new line to be added to my shop (www.ColorHug.com) and am also in the midst of a site redesign. The site redesign will come with new product images, and I'm all about styling the photos. I wanted to do this without spending too much money on props, so I decided to check out the Dollar Tree and see what they had. One prop that I knew I wanted in the photos were party horns. I found a pack and decided to make my own horn from pretty papers since the generic designs weren't anything to write home about.
Here is what you need:
First, I popped the horn out of the mouthpiece then pulled it apart at the seam.
This created my template. I then placed the flattened horn onto the paper that I chose and cut around it.
I then rolled the paper encouraging it to form its intended shape.
Next, I slid one end of the paper into the mouthpiece and shaped it into a horn. I placed a paper clip on the end to keep the shape.
Then I glued the paper at the seam.
And there you have it...a cute party horn!
I added a few fun elements to a couple of the horns. The possibilities are endless. You can easily customize these to fit the theme of any occasion at a great price (a pack of five was one buck!).
I wanted to share with you all a recent DIY project that I completed. I'm in the process of finalizing a new line to be added to my shop (www.ColorHug.com) and am also in the midst of a site redesign. The site redesign will come with new product images, and I'm all about styling the photos. I wanted to do this without spending too much money on props, so I decided to check out the Dollar Tree and see what they had. One prop that I knew I wanted in the photos were party horns. I found a pack and decided to make my own horn from pretty papers since the generic designs weren't anything to write home about.
Here is what you need:
First, I popped the horn out of the mouthpiece then pulled it apart at the seam.
This created my template. I then placed the flattened horn onto the paper that I chose and cut around it.
I then rolled the paper encouraging it to form its intended shape.
Next, I slid one end of the paper into the mouthpiece and shaped it into a horn. I placed a paper clip on the end to keep the shape.
Then I glued the paper at the seam.
And there you have it...a cute party horn!
I added a few fun elements to a couple of the horns. The possibilities are endless. You can easily customize these to fit the theme of any occasion at a great price (a pack of five was one buck!).
Labels:
Color Hug,
crafts,
DIY,
event branding,
hack
Friday, June 7, 2013
May
My favorite month of the year...how did it slip away so fast? May is actually one of the busier months of the year for me because all but one weekend involves family activities. These activities are Mother's Day (the second week), my birthday (the third week) and Memorial Day (the fourth week). I haven't been documenting life as much lately, but here are some photos from Mother's Day. After getting a manicure and pedicure, we went back to my house and had lunch then tea time. We (my Mom, Grandma, Sister and I) dressed up, wore fancy headgear (some which were DIY) and gloves. My sister and I also decorated the table (some of which were fresh cut roses from my yard!). My sister made a Salmon Nicoise salad and the finger sandwiches, and I made White Bean and Kale soup and put the dessert display together. We went all out! Here are some photos-
Us ladies :)
The fascinator that I made for my Mom-
The fascinator that my sister made for our Grandma-
My sister's fascinator
My fascinator (DIY!)
Enjoy the weekend!
Us ladies :)
The fascinator that I made for my Mom-
The fascinator that my sister made for our Grandma-
My sister's fascinator
My fascinator (DIY!)
Enjoy the weekend!
Labels:
DIY,
holidays,
tablescape
Subscribe to:
Posts (Atom)