Showing posts with label quickies. Show all posts

Friday, April 26, 2013

A Gold Leafing Mini Makeover

Yes, I confess, my gold leafing pen is one of my favorite things.  I'm in the process of prettying up my office and my desk has been changing slightly.  I was using a cute plastic cup to hold my writing utensils but I wanted to find something else.  While I was at Lowe's I checked out their bathroom decor section (they always seem to have things on clearance in that area) and I came across a toothbrush holder on clearance for four bucks.  Since the colors for my office are going to be gold, black, pink and white I snatched it up.


The only issue was the silver detail.  I decided to gold leaf it and this is the result.


This was one of the quickest makeovers I've ever done :)

Enjoy the weekend!

Monday, July 23, 2012

Making things work for the height challenged

If I haven't mentioned before, I happen to be kind of short.  I'm 5' 3.5" (yes, I include the half, I could use all of the height that I can get).  I happen to be too short to reach the upper half of my kitchen cabinets and microwave.  Simon bought me a step stool so that I can reach, and he thinks it's so cute that I have to use it.

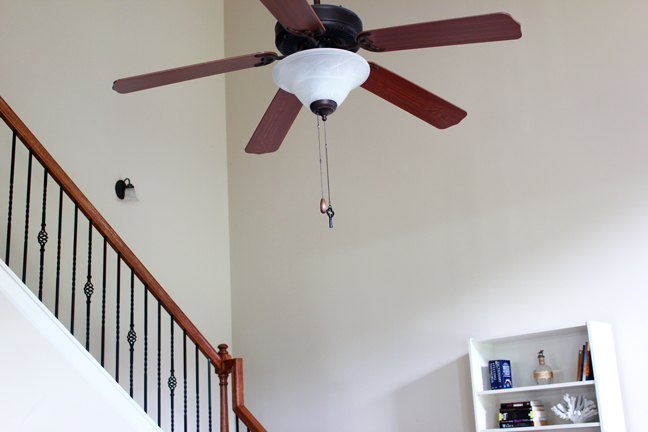
The ceiling fan in our living room happened to also be a challenge for me.  Since it's a two story living room, the fan is on a pole.  Apparently the length of the pole doesn't have shorties in mind.  Because of this, in order to adjust the fan speed I had to stand on the couch to reach the pulls.  This is how they looked before.


They were pretty high up there.  A few months back I purchased a decorative extender but never attached it.  I finally got around to doing it last week.  This is what it looked like after the switch.


As you can see the new pull was much longer than the one next to it.  Because of this, instead of buying another extender chain, I used the chain that I just replaced, cut the end piece off and attached it to the other chain.


This is how they look now.


Now I can finally reach the pulls without endangering myself!  I still have to stand on my toes to reach them, but that's no biggie.

Tuesday, May 1, 2012

Chalk and wine don't mix...or do they?

It's May 1st (officially 19 days away from my 30th b'day, yay!) which means that Spring should have sprung everywhere by now.  What better way to enjoy than with a bright, fun craft project!

I have had this image pinned to my pinterest board for a while now and have wanted to do it, just never got around to it.

{credit}

For the last pinterest challenge I was actually planning on doing this project, but things didn't work out and I did this instead.

Since the materials were still sitting on my dining room table (yes, for over a month) and Simon told me to clean the table off before he got home, I decided to move forward with it.  Initially I wanted to make my own chalkboard paint and customize the color.  Economically it didn't make sense especially since I was only going to be painting two glasses.  I then found pink chalkboard paint in a bottle at Hobby Lobby, and it was only $3.25...score!

Materials


1. Stemmed glasses
2. Chalkboard paint
3. Paint brush (I chose a sponge brush)

The Process

1. Paint one coat of chalkboard paint onto the glass vertically then let it dry for one hour.

2. Paint a second coat horizontally then let it cure for 24 hours. (I ended up doing three coats total because two wasn't good enough to me)


{3 coats}

 3. Condition the chalkboard paint by rubbing chalk over the surface.


4. Wipe chalk off with a damp towel.

5. The end.  Oh yeah, write something on the glass to test it out!


I love how these turned out, and Simon admitted that he thinks they are cute (even though he's not fond of pink).  These will be great to use when we have guests over so that they can keep track of their glasses in a fun way!  Of course I will need to make a few more of these to accommodate my family...and I will probably do black chalkboard paint for the guys.

Have you completed any fun craft projects lately?  Please share!

Thursday, February 9, 2012

My First Take at Bookcase Styling

I have dreams of becoming an interior stylist.  It sounds fun, I love photography...I love pretty much anything creative.  I have been searching for resources that explain styling techniques with no luck.  If you know any great resources please let me know!  Over the weekend I was itching to do something around the house.  I recently won a giveaway for 10 coffee table design books hosted by Monique Valeris of Decor Musings, and hadn't quite found the perfect spot for them.  After looking around I realized that the best place for them is in a common area, so the great room seemed fitting.  Simon had a small bookcase in his office that he no longer used, so I decided to do a little organizing with it.

This is how the area looked before-


And this is after-


I really enjoy the set up especially now that the stereo is off of the floor!  The books now have a home, and the little accessories add character.  As the title states, this is my first take at styling a bookcase...or anything for that matter.  I plan to get better over time!

Now I just have to figure out what to put on that huge, empty wall.  And by huge I mean two stories high...Oy!  There's always something to do.

Tuesday, December 13, 2011

Dining Room Updates

November was a pretty busy month full of all sorts of DIY projects.  I'm going to cover two of them tonight.  The first is dining room no-sew curtains, and the second a little spray paint to a tray (you knew spray paint was going to be in this post somewhere, didn't ya?).

As you may know, we made LONGGG curtains for our great room earlier this year (check it out here if you haven't seen them).  It took a while and was our first time making them, so we figure we're veterans now when it comes to making smaller ones.  I went to the same fabric store from before and got the fabric for $3.99 a yard (that's the regular price of all fabric in the store!).  I found this fabric and really liked it because it would blend well with the other curtains but still have it's own personality.


I ended up making these by myself, and it only took about three hours (much better than the three days it took us to make the other ones).


Just to remind you, here are some before pictures of the Dining Room.

Shortly after moving in.

A few months after moving in.

The day before the curtains went up.

Another angle.
And this is the end result


I plan on keeping the curtains open and replacing the shades with a pair that have a thermal lining so that it will help to keep the room warm.

The second project that I completed was changing the color of the tray that our liquor bottles are on.  You may remember the tray from this post.  I had been contemplating if I wanted to keep it the jade color that it was or spray it a different color.  I decided to spray the inside gold and keep the outside jade.


I enjoy the result!

Wednesday, October 12, 2011

A mini project

As I was loading some images onto my computer, I came across this quickie that I forgot to share.  Simon acquired this picture frame from work, and he only brought it home because he thought that I would appreciate fixing it up.  He was so right, even if it took a couple of months to finally get to.

Nice...um...frame...and um...picture.  Actually the picture could work in the right place.  Just not my house!


Beautiful white spray paint, we meet again.


Been fishing lately?


DIY matte


(the following image is unrelated to the matte, I just felt like including it)

The end result.  I'm thinking about hanging this in my office, but then I just thought about swapping out the image and hanging it in the guest bathroom.  Who knows.


(Print available here!)

So that's my little quickie.  Aren't quickies great?

Monday, July 11, 2011

The Story of the Hook

...And I don't mean Captain Hook.

Let's make this short and sweet.  In fact, perhaps I can get the whole story out in pictures...yeah lets try that!  Go!


The End!  And now all is well in towel world in my bathroom.  Oh yeah, the hook was approx. $1.89.  It was 50% off at Hobby Lobby!  I'll probably spray paint it another color when the time comes, but it's just fine until then!