Showing posts with label crafts. Show all posts

Monday, July 8, 2013

DIY Party Horns (AKA Dollar Store Hack)

Hello there!  I hope you all had a great weekend.  Mine was busy, but I had a four day weekend so I can't complain.

I wanted to share with you all a recent DIY project that I completed.  I'm in the process of finalizing a new line to be added to my shop (www.ColorHug.com) and am also in the midst of a site redesign.  The site redesign will come with new product images, and I'm all about styling the photos.  I wanted to do this without spending too much money on props, so I decided to check out the Dollar Tree and see what they had.  One prop that I knew I wanted in the photos were party horns.  I found a pack and decided to make my own horn from pretty papers since the generic designs weren't anything to write home about.

Here is what you need:


First, I popped the horn out of the mouthpiece then pulled it apart at the seam.


This created my template.  I then placed the flattened horn onto the paper that I chose and cut around it.


I then rolled the paper encouraging it to form its intended shape.

Next, I slid one end of the paper into the mouthpiece and shaped it into a horn.  I placed a paper clip on the end to keep the shape.


Then I glued the paper at the seam.


And there you have it...a cute party horn!


I added a few fun elements to a couple of the horns.  The possibilities are endless.  You can easily customize these to fit the theme of any occasion at a great price (a pack of five was one buck!).


Friday, April 26, 2013

A Gold Leafing Mini Makeover

Yes, I confess, my gold leafing pen is one of my favorite things.  I'm in the process of prettying up my office and my desk has been changing slightly.  I was using a cute plastic cup to hold my writing utensils but I wanted to find something else.  While I was at Lowe's I checked out their bathroom decor section (they always seem to have things on clearance in that area) and I came across a toothbrush holder on clearance for four bucks.  Since the colors for my office are going to be gold, black, pink and white I snatched it up.


The only issue was the silver detail.  I decided to gold leaf it and this is the result.


This was one of the quickest makeovers I've ever done :)

Enjoy the weekend!

Tuesday, February 5, 2013

Fake It 'Til You Make It

Hey there!

Listen...you all know that I'm a decisive person in training, right?  For a few months now I've been seeing things like this all across the web-

source

Yep, paint dipped legs.  However, this poses a problem. What will happen when I get tired of the color that it was dipped in?  Well, today I'd like to share with you a simple and quick solution to this problem.

Here's my craft desk (one of the three desks in my office...oy!).


My solution?  Use colored paper.  I chose pink.

Just cut the paper to the height that you want the dipped effect to go up to...


...then wrap it around the legs and secure with tape!


This took me a total of around 5 minutes to complete...seriously.  The best thing about it is that I can change it at any time!


What are your thoughts on paint dipped furniture?

**update: I am linking this project up for the Pinterest Challenge Winter Edition here, here, here and here

Wednesday, January 23, 2013

Just Add Paint

Hi there!  I hope all is well on your end.  I wanted to share with you a quick craft that I completed over the weekend.

To make a long story short my mobile is toast.  As of Saturday morning only the power button was functioning properly so in order to exit apps I had to restart the phone each time.  For a few weeks only one button didn't work, then on Saturday the other three stopped working one after the other.  Luckily Simon had his old phone (which is the same model as mine), so I had the "fun" task of transferring all of my info to his phone and resetting everything (apps, appointments, emails, contacts, etc.).  I considered buying a new phone until I saw the going rate...yikes!

To make myself feel better I decided to update his old phone cover.  They only have cute covers for iphones it seems, so I decided to make my own cuteness.

This is how it looked before


  I pulled out the pink and gold paint and ended up with this-


Since I painted freehand the lines aren't perfectly straight, but hey, that just gives it more personality!

Thursday, November 29, 2012

DIY for Thanksgiving

As promised, this post is dedicated to the DIY projects that I completed for our Thanksgiving tablescape!  I spent approximately $10-$12 on all of the decor mainly because the majority of items were already laying around the house...oh, and because I was on a tight budget.

First up is the runner.  I purchased a yard of fabric from Joann's ($7.99) and cut it in half to make two yards.  I used the same hem tape technique that I did to make our curtains (here and here), so there's really no need to go into detail about that.  All that matters is that I think I am becoming a hem tape pro!


Next are the pumpkins.  I purchased two small "pumpkin pie" pumpkins (approximately $4 total) and decided that i wanted to paint them.  At first I was going to spray them white and spray the stem gold, but after some thought I decided to paint the pumpkins purple and spray the stem gold instead.  The purple paint was from a sample paint can from two years ago.  I also used this paint over the summer to paint some planters, so I'm getting good use out of it.
When I sprayed the stems gold, I didn't cover the pumpkin so of course a little gold landed on the top.  I studied it for a moment then realized that I liked the look, so I ended up spraying more to deliberately spread the paint mist.  During this impromptu spraying action some of the gold decided to run down one of the grooves on the pumpkin.  At first I thought "oh crap, I screwed that up", then after studying again I realized that I loved the drippy look!  I then started spraying even more to cause drips all around.  I love how they turned out.


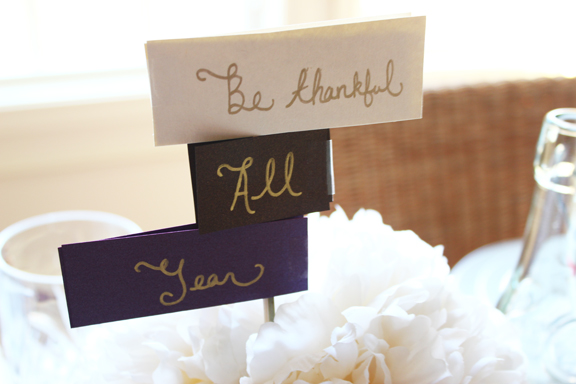
I then made a sign to stick into the bouquet by taking paper scraps of purple, brown and champagne and writing the words "Be thankful all year" on both sides in gold.  I attached the papers to a wooden stick and slid it into the vase.  I also made place cards by writing each name with the gold pen onto purple paper and placed them on top of the rolled napkins.


Last, I wanted to incorporate the cinnamon sticks that I had in the pantry.  I would probably not be using them any time soon, so I decided to stack them up sort of like a stack of wood then tie them up with a purple ribbon.


As far as the rest of the decor, you may recognize the glass bottles from my last pinterest project (we ended up pouring red grape juice into them for dinner, so it matched perfectly), I put the flowers that were in a vase on the great room bookcase into a different vase and tied purple ribbon around it, and the candle holders were already on the table, so luckily they matched.


Oddly enough, this was the least expensive table decor and happens to be my favorite of all!  I guess that's how things work out sometimes.

Do you find yourself scouring through the house to find items to use when redecorating if your money is looking kind of funny?

Tuesday, October 9, 2012

Speaking of Gold Leafing {AKA a quick DIY}

I mentioned in my last post that I have been going crazy with my gold leafing pen.  Here's more proof of that.  As you may know, I am the owner of a paper goods company called Color Hug.  I decided to make and print my own business cards because I came across the perfect paper for it.  Then after seeing images from pinterest of people adding color to the edges of their business cards I decided to give it a go.

Here's my business card before the pen had its way


I pressed the cards together to make a tight edge in order to prevent leaking.


Next, I colored all four edges.


They didn't turn out half bad!


This is a quick and simple project that you can do to add some interest to your business card.  I would imagine any marker would work the same.

Have fun!

Monday, October 8, 2012

Autumn Mantel

Hello there!  Hope you had a fun weekend.

This is my first time decorating the mantel for autumn, but I just got the urge to do it.  Maybe it's because I have a better attitude about this autumn...who knows.  Anyway, I decided to do a little craft project similar to the cupcake bunting that I made for my sister's birthday except with rectangles and my gold leafing pen.  I really love my gold leafing pen.  I have used it so much that it's about time for a new one and I've only had it for a month!

To make this bunting, I did the same thing as before, so there's really no need for a step by step in detail.  Here's the summary:

1.  Cut out shapes from cover stock (I chose rectangles) and color the paper (unless you are smart and buy a paper that is already colored!).


2. Poke two holes into each piece of paper.


3.  String the paper onto a wire/string/thread, whatever you want to use.  No picture of that, but you get the point.

This is how it turned out


And this is the mantel.  Didn't have to purchase anything, I already had everything from previous years!


I think I might make another bunting to accompany that one because it looks a little lonely up there.

Have you decorated your mantel for autumn yet or do you even do that?  If so I'd love to see!  Leave a link in the comments.